In-Place Encryption
This feature lets you encrypt a selected text within your note.
Inline password hints cannot contain 💡 or 🔐, because these characters delimit the encrypted block and its hint.
To Encrypt Selected Text
Option 1: Use the Command Palette
- Go to Files by clicking the Files icon
 .
- Create a new note by clicking the New note icon
 or select an existing one.
- Select a text to encrypt.
Note: A partial selection will be expanded to include the whole line if the Expand selection to whole line setting is enabled (see the Settings section).
- Open the Command palette by clicking the Open command palette icon
 .
- Type or scroll to Encrypt selection, then select it.
- Enter and confirm a password. You can add an optional password hint.
- Click Encrypt.
Option 2: Use the Encrypt selection Ribbon Button
- Go to Files by clicking the Files icon .
- Create a new note by clicking the New note icon or select an existing one.
- Select a text to encrypt.
Note: A partial selection will be expanded to include the whole line if the Expand selection to whole line setting is enabled.
- Click the Encrypt selection ribbon button.
- Enter and confirm a password. You can add an optional password hint.
- Click Encrypt.
To Reveal or Decrypt Selected Text
Option 1: Use the Command Palette
- Go to Files by clicking the Files icon .
- Select the note with the encrypted text.
- Place your cursor anywhere on the encrypted text.
 The screenshot shows a legacy block; current blocks use a newer format with the same cursor-based workflow.
- Open the Command palette by clicking the Open command palette icon .
- Type or scroll to Decrypt, then select it.
- Enter the correct password.
Note: Your previously used password is filled in by default (you can change this in the plugin settings).
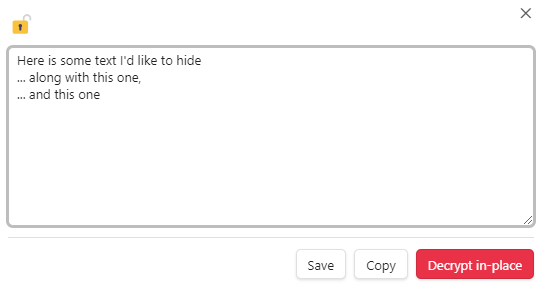
- Your decrypted text appears in a dialog window. You can save it, copy the text, or click Decrypt in-place to decrypt the text directly in the note.
Option 2: Use the Decrypt at Cursor Ribbon Button
- Go to Files by clicking the Files icon .
- Select the note with the encrypted text.
- Place your cursor anywhere on the encrypted text. The screenshot shows a legacy block; current blocks use a newer format with the same cursor-based workflow.
- Click the Decrypt at Cursor ribbon button.
- Enter the correct password.
Note: Your previously used password is filled in by default (you can change this in the plugin settings).
- Your decrypted text appears in a dialog window. You can save it, copy the text, or click Decrypt in-place to decrypt the text directly in the note.
Reading View
Click a visible 🔐 marker to reveal its decrypted text. This popup is read-only and offers Copy. To edit and save encrypted text, switch to the editor and use the Decrypt command.
Saving Edited Text
In the editor’s decrypted-text dialog, Save re-encrypts your edits using the same password, hint, and reading-view marker visibility. Legacy inline blocks are upgraded to the current encryption format when saved this way. Decrypt in-place replaces the block with plaintext in the note.
In the password dialog, Enter moves through the password, confirmation, and hint fields as applicable. Moving to the hint field does not accept the dialog; press Enter there to submit, whether you enter a hint or leave it empty. Closing the dialog before submission discards the result.